Raiditem is the most quality site for WOW Gold & other game items buying.


News
Strategy
This is the final encounter of the tier and possibly the most difficult. The fight consists of two areas, a main area and an outer shrine. 2 (possibly 3) tanks are required for the fight. Each area will be explained below.
Main Area
The boss himself is stationary in the middle of the main area. To start the fight, the main tank simply stands on the circle directly in front of him. This gives him/her the buff Champion of Light. This creates the Wall of Light, forming a cone behind the tank. Anyone who stands in this cone takes 10% less damage and deflects the boss' Breath of Fear attack which will be explained later. The diagram below shows where it is safe to stand.
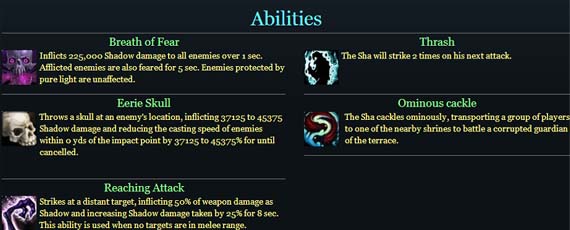
If no one is in the Pure Light, the boss will use Reaching Attack. The boss starts attacking players at a distance dealing 100% melee damage and applies a stacking debuff that increases shadow damage by 20% per stack for 12 seconds. To avoid this, the tank cannot die, and if the tank is no longer in the Pure Light, another tank needs to get in there quickly.
The boss' key mechanic in the main area is Breath of Fear. Over time, the boss gains energy. Once he hits 100 energy, he'll use this breath, which does 150k (225k) shadow damage every 0.5 seconds for 1.5 seconds. Also, anyone hit is feared for 5 seconds. However, any player who stands in the safe zone will not get hit by this ability so players must ensure they get to the safe zone before the breath.
Tags:

Kindly Reminder:Possible account termination when using illegal leveling or illegally obtained gold.

Subscribe to our weekly
shameless plug!